
Apple has always been an accessibility-focused company. The idea that Apple’s devices should be easily usable by everyone was enshrined into Apple’s DNA by Steve Jobs. Tim Cook continued the philosophy that accessibility is a top priority for the company.
With every new OS release, Apple ensures everyone can easily use an iPhone, iPad, Apple Watch, or Mac. The Fall release of iOS 15 was no different. While the iPhone’s accessibility features intend to improve usability for those with disabilities, many of those same features can offer UI and functionality improvements for any user. Suppose you’re someone who wants to get a little more customization out of their iPhone. In that case, you might find some of the accessibility settings to be interesting.
Here are some of my top accessibility setting picks to get you started.
VoiceOver
‘VoiceOver’ is a feature built into iOS and macOS that makes using an Apple device easier for the visually impaired. When VoiceOver is enabled, a black box forms around objects within iOS and a voice assistant will announce the text or tappable object. The user still navigates iOS by tapping on their iPhone, but VoiceOver will audibly confirm where the user taps. In addition, a one-finger double-tap anywhere on the screen will act as a regular tab for selecting objects. If you ever get trapped in VoiceOver mode, simply hold down your home or side button and ask Siri to turn off VoiceOver.
To enable VoiceOver:
1. Launch the Settings app on your iPhone
2. Scroll down and tap on Accessibility
3. Tap on VoiceOver
4. Toggle VoiceOver on
Zoom
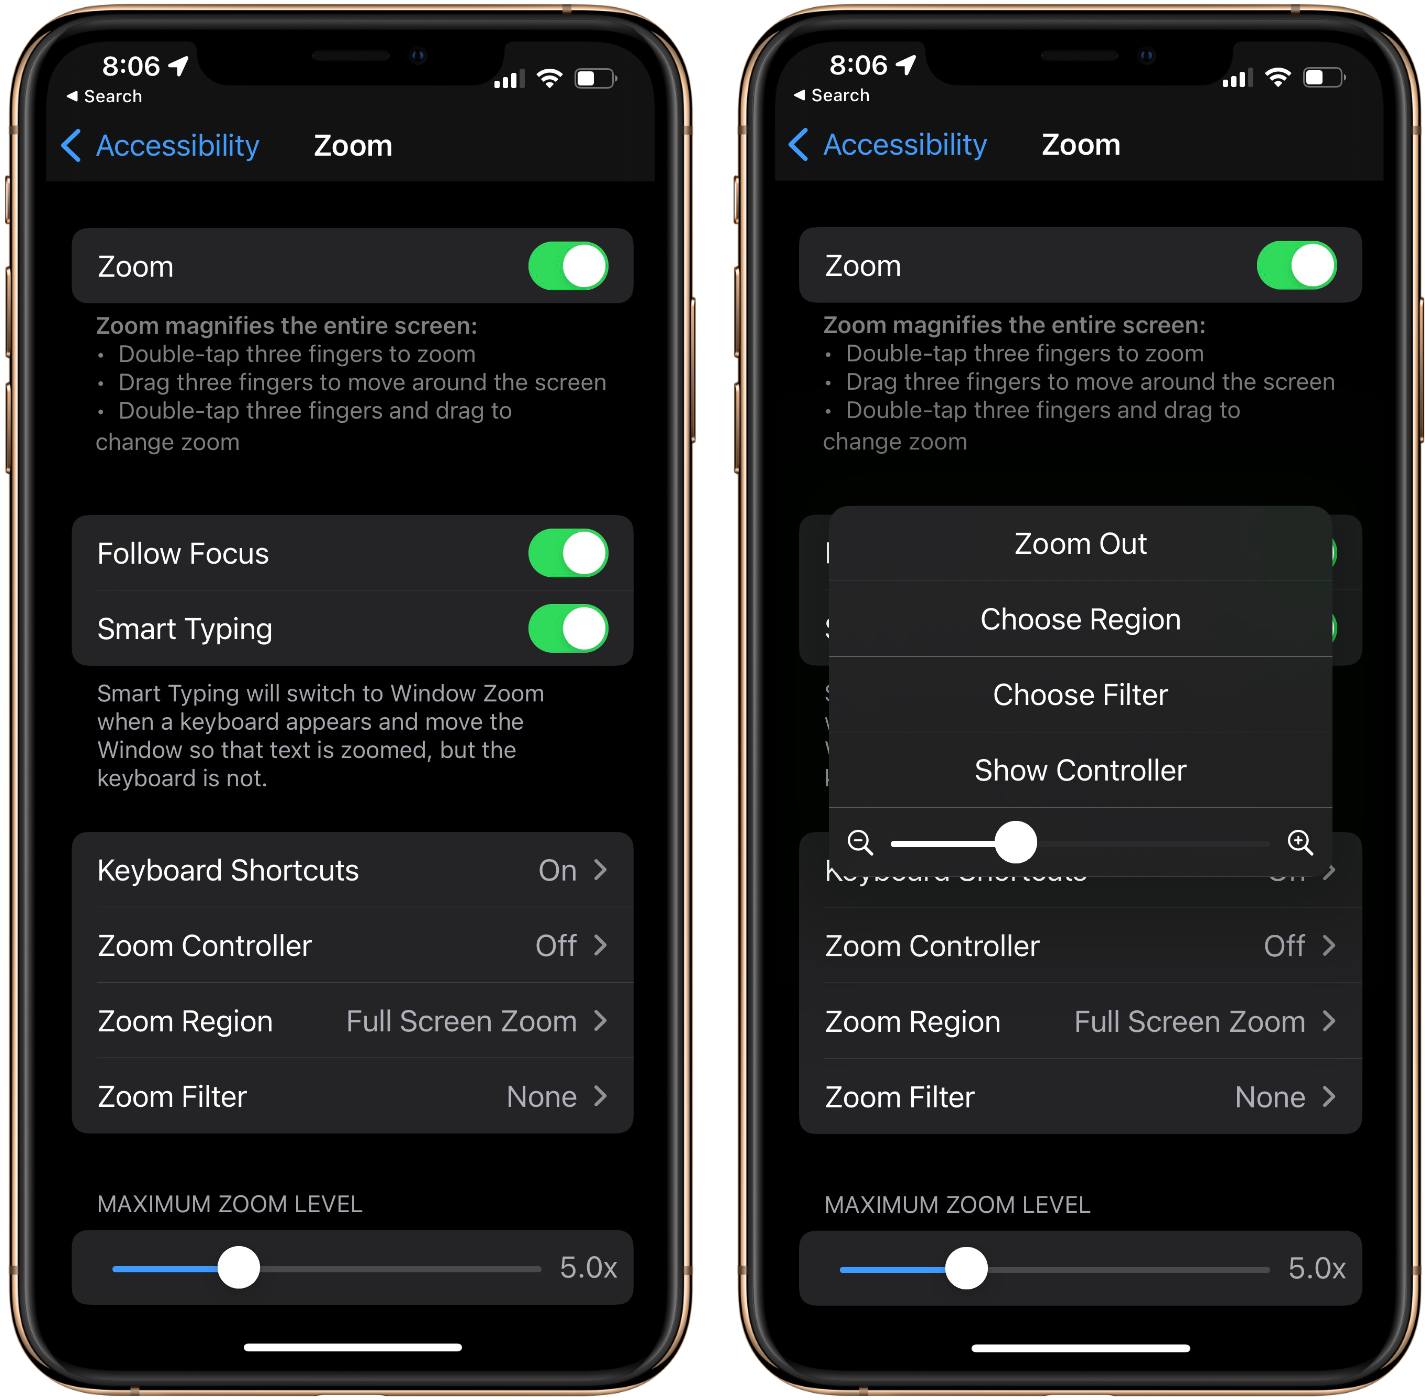
When ‘Zoom’ is enabled, a user can double-tap with three fingers anywhere on the screen to magnify the objects within iOS. You can then drag three fingers around the screen to move around or double-tap with three fingers to exit zoom mode. Triple-tapping with three fingers will expose a zoom slider so you can pick the appropriate magnification for you. Zoom is meant to assist visually impaired users with reading content on their iPhones.
To enable Zoom:
1.Launch the Settings app on your iPhone
2. Scroll down and tap on Accessibility
3. Tap on Zoom
4. Toggle Zoom on
Display & Text Size
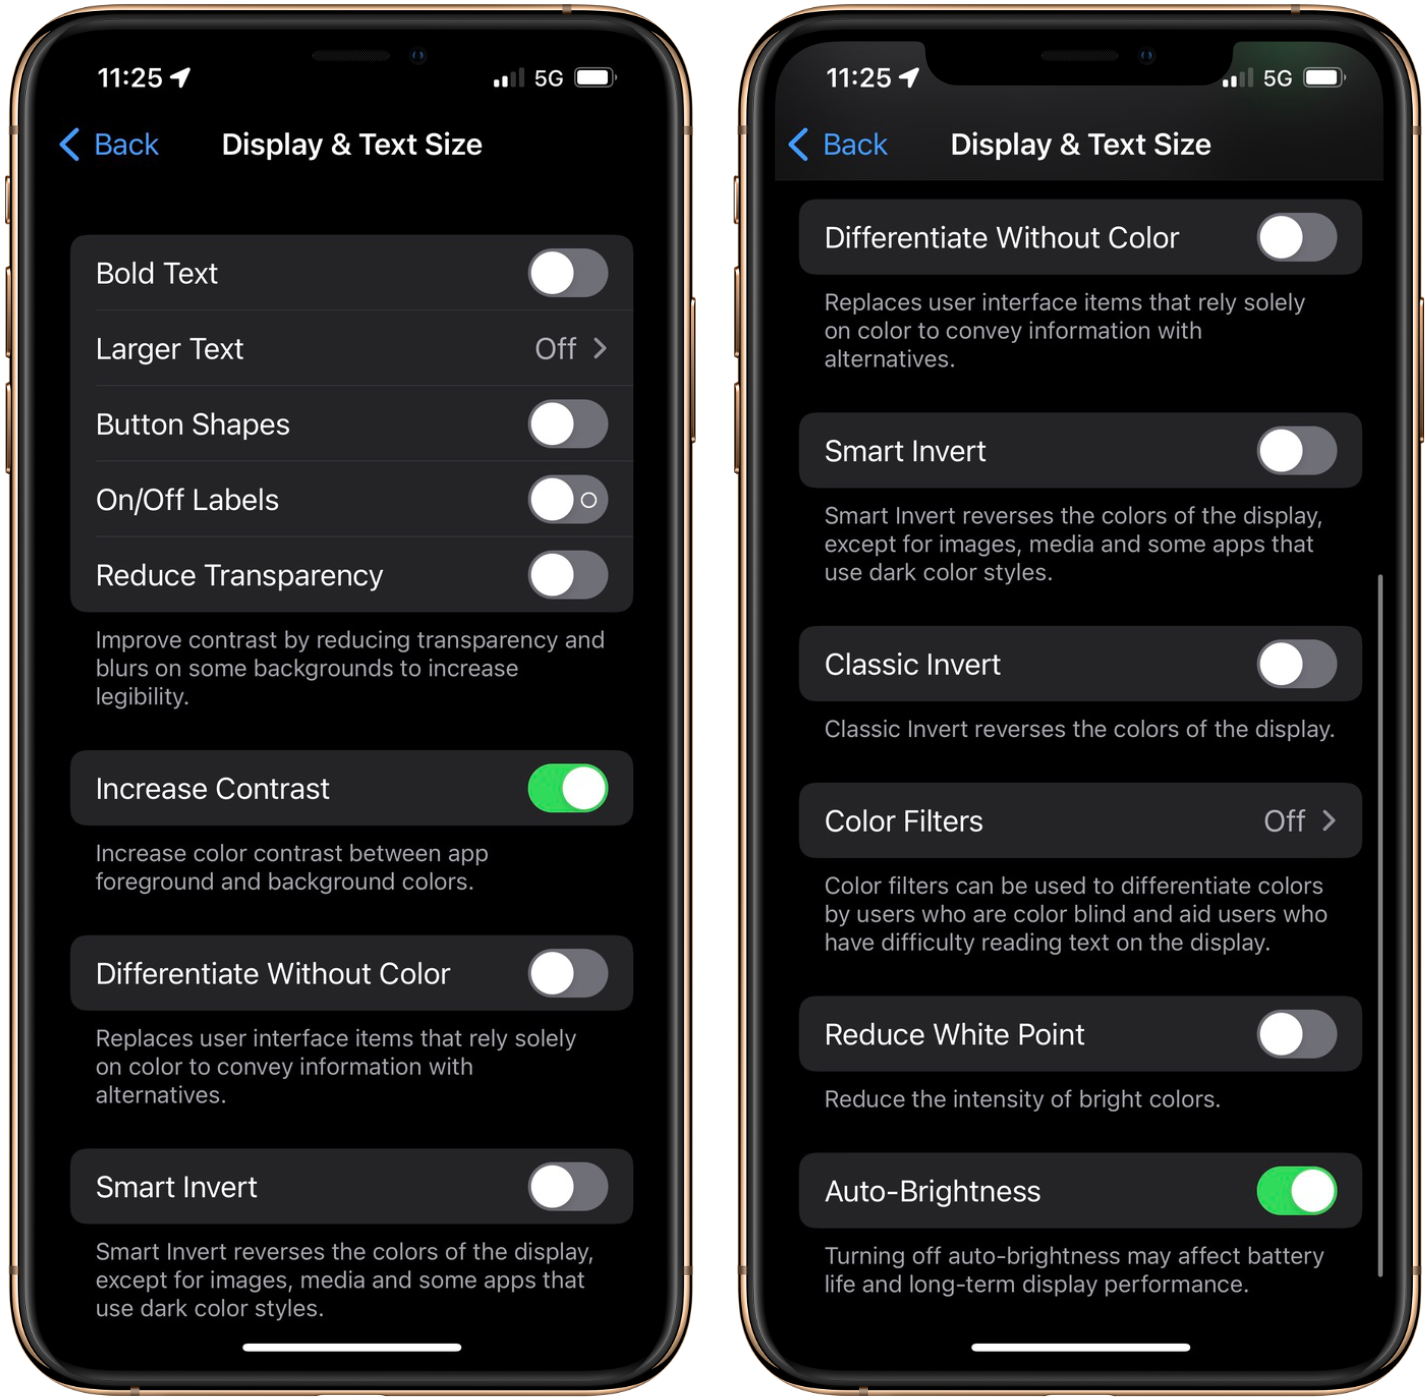
‘Display & Text Size’ offer several user-interface (UI) changes that you can select from. These changes are meant to help users with visual impairments. Still, you may also prefer the aesthetic differences of some of these settings. For example, toggling on ‘Bold Text’ will bold all of the text within iOS, while tapping on ‘Larger Text’ will bring you to a page where you can toggle on larger accessibility sizes. These font sizes are larger than the default options presented in the settings app.
Toggling on button shapes will underline some tap targets within iOS to make them more identifiable. On/off labels will put an ‘O’ or ‘I’ in the toggle so you can quickly identify if they’re on or off without relying on the green and grey colouring. Reduce Transparency will remove the translucent backgrounds found throughout iOS and replace them with a simple black background. You may initially notice this when you swipe up into your app switcher. Increased Contrast will make your colours deeper. Throughout display & text size, you’ll find several other settings that allow you to adjust iOS’s colour and appearance.
To enable Display & Text Size settings:
1. Launch the Settings app on your iPhone
2. Scroll down and tap on Accessibility
3. Tap on Display & Text Size
4. Toggle on the features you would like to enable
Motion

Apple’s iPhone 13 Pro and Pro Max feature a 120Hz ‘ProMotion’ display. Some users are particularly sensitive to the animations within iOS, making them motion sick. Even if you don’t have a device with ProMotion, you may find some of the animations make your stomach churn.
Apple has added some settings within Accessibility to alter or remove those animations. Reduce motion will replace the app switching transitions within iOS with a clean blur-like effect. If you don’t like the adjustable frame rate that ProMotion offers, you can toggle it off on this page. iMessage effects and videos can auto-play in iOS. You can toggle those on or off on the Motion page.
To adjust your Motion settings:
1. Launch the Settings app on your iPhone
2. Scroll down and tap on Accessibility
3. Tap on Motion
4. Toggle on/off the features you would like to enable/disable
Touch
Touch is another one of my favourite places to adjust iOS settings based on personal preferences. First, we have AssistiveTouch. Enabling AssistiveTouch will put a virtual home button on your screen. Tapping on the virtual home button will present you with buttons use can use to action swipe-enabled gestures like control centre or going back to the home screen. When Reachability is enabled, you can swipe down on the white line at the button of Face ID iPhone or double-tap (not click) the home button if your iPhone has one. In addition, the content on your iPhone’s screen will shift downwards for easier one-hand navigation.
Some people find Haptic Touch is too quick for them. This is especially noticeable for users with slower reflexes. You can make the touch duration slower in your Touch settings. If you don’t want your iPhone’s display to turn on by tapping it, you can disable it within the touch settings. Shake to undo is another handy feature. I frequently use it when I delete text by mistake.
To adjust your Touch settings:
1. Launch the Settings app on your iPhone
2. Scroll down and tap on Accessibility
3. Tap on Touch
4. Toggle on/off the features you would like to enable/disable
Face ID & Attention
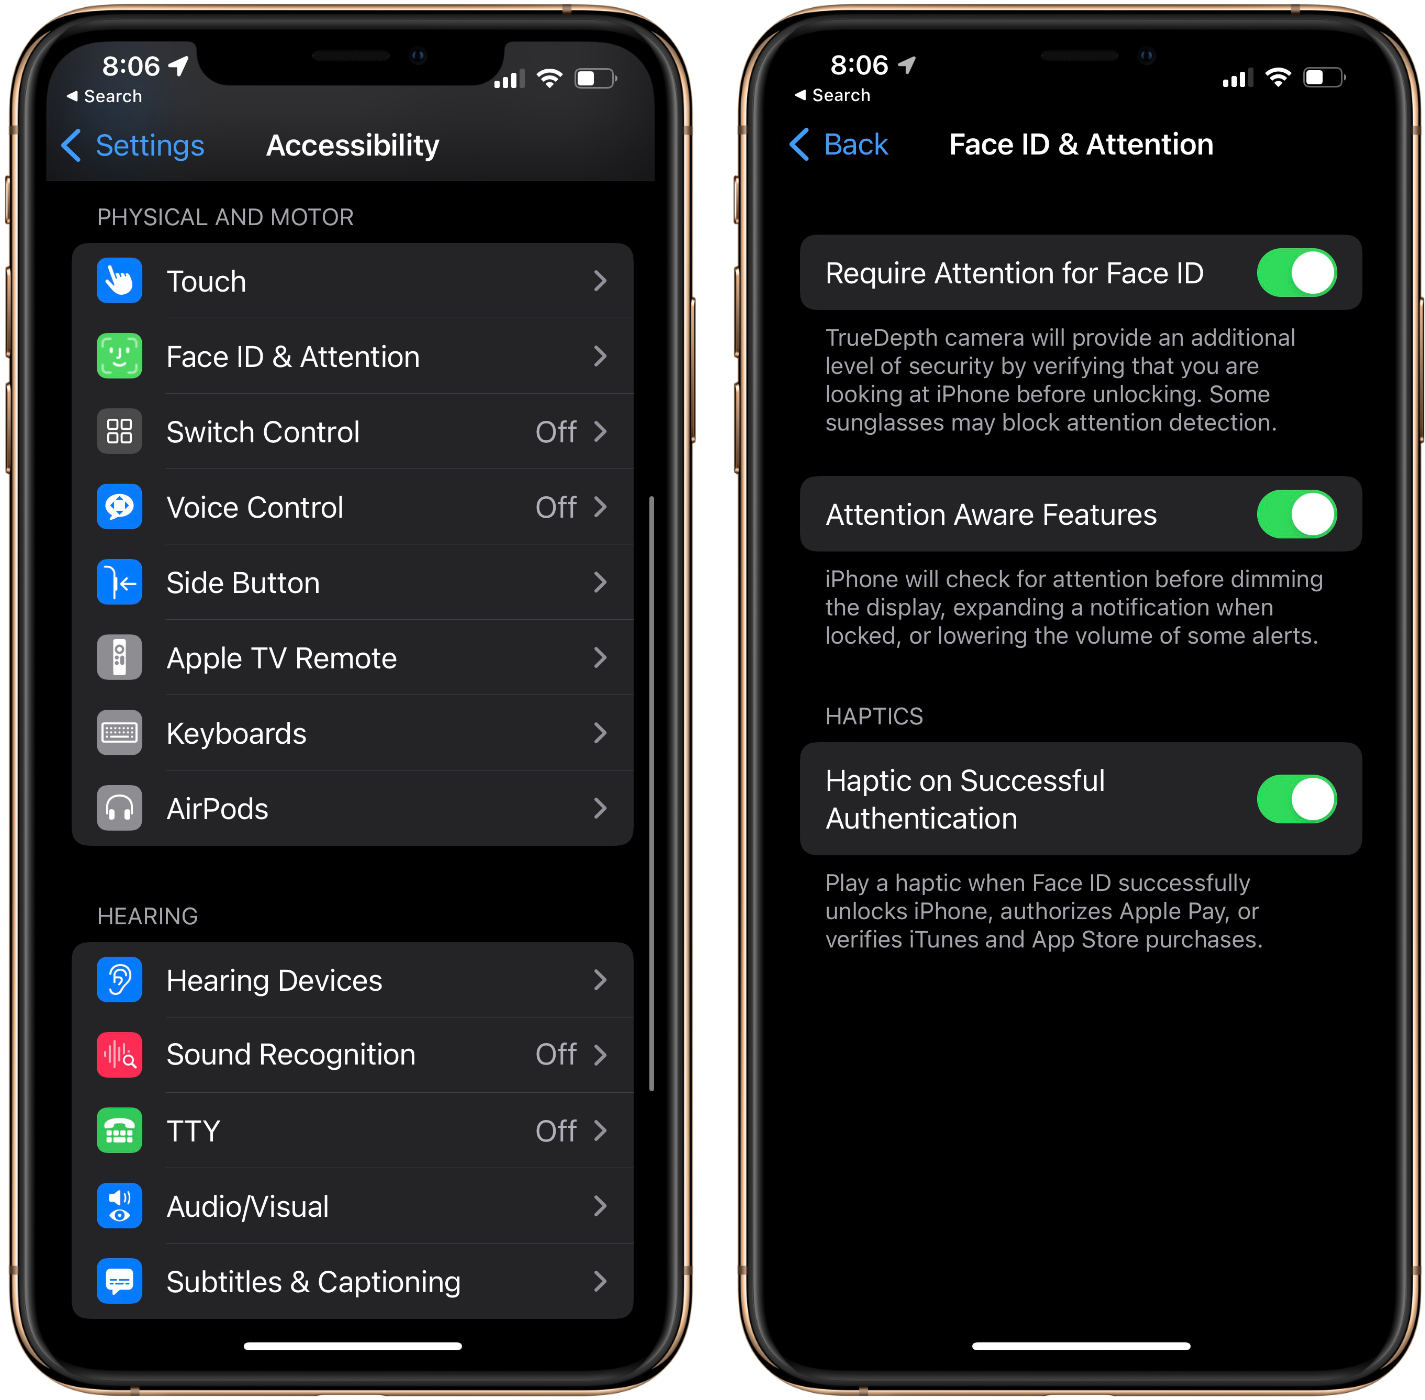
With the release of the iPhone X, Apple introduced a few exciting benefits of the TrueDepth camera that users may only passively notice. For example, Face ID will not unlock until you look at your iPhone’s FaceTime camera with your eyes open. You can disable ‘Require Attention’ for Face ID within the ‘Face ID & Attention’ section of the Accessibility settings.
Some people may want to unlock their iPhone without looking directly at their iPhone. At the same time, others have an accessibility reason for why they would like to turn it off. Note that disabling Require Attention for Face ID does reduce your iPhone’s security and potentially makes false-positive unlocks more common.
You can also disable Attention Aware Features, where your iPhone will check for a person looking at it before dimming the display or expanding the notification prompt. In addition, iPhone users with a TouchID device can always show app notification previews when locked or display them after validating with Touch ID. Lastly, you can disable Haptic feedback on Successful Authentication if you don’t like your iPhone providing a small haptic response upon being unlocked.
To adjust your Face ID & Attention settings:
1. Launch the Settings app on your iPhone
2. Scroll down and tap on Accessibility
3. Tap on Face ID & Attention
4. Toggle off the features you would like to disable
Voice Control
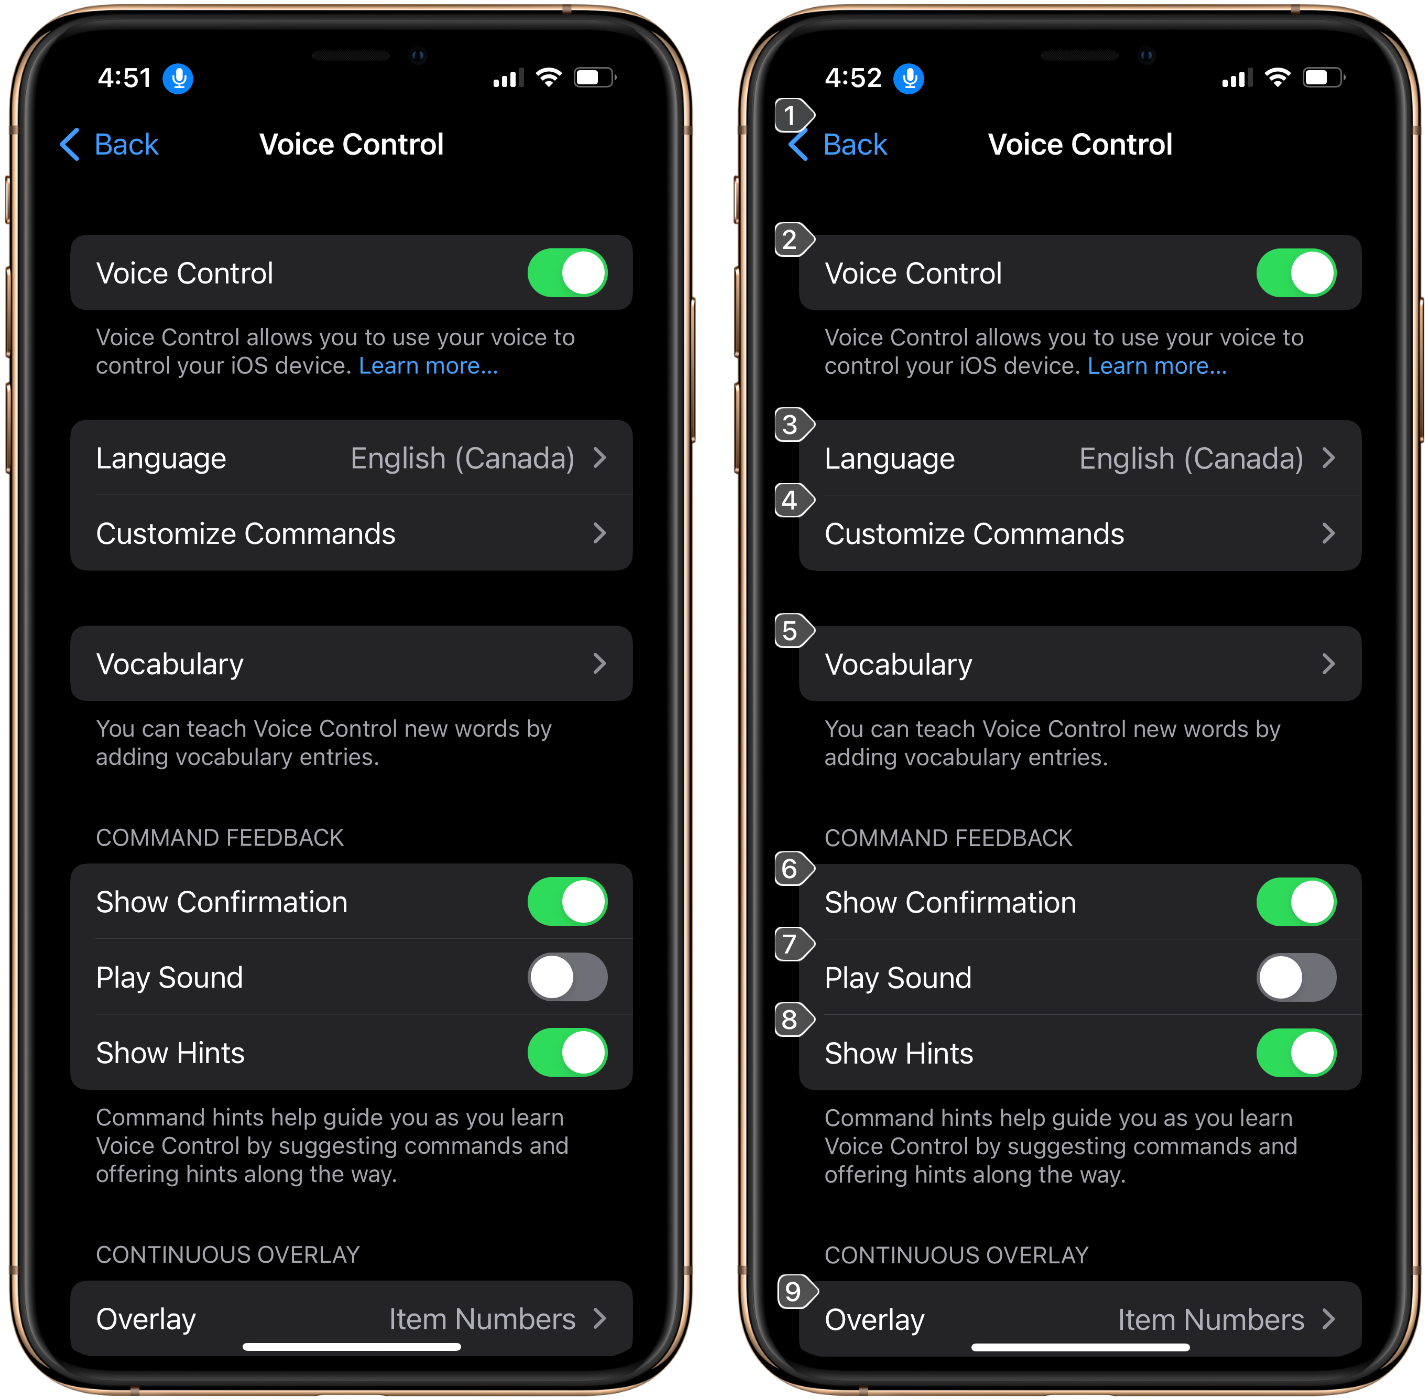
Voice Control has existed on iOS since 2009, but with iOS 13 in 2019, Voice Control received a significant improvement. Enabling Voice Control will place a blue microphone in the top left corner of your display. In a sense, Voice Control is like having Siri turned on 24/7, but you do not need to use a trigger phrase. Simply tell your iPhone to tap on an object, type a sentence, or launch an app. Voice Control makes iOS and macOS completely hands-free for people with limited motor skills.
To enable Voice Control:
Launch the Settings app on your iPhone
Scroll down and tap on Accessibility
Tap on Voice Control
Toggle Voice Control on
LED Flash for Alerts
If you’re anything like me, you keep your iPhone on silent twenty-four hours a day. But sometimes, I sit my iPhone down, and I miss notifications from my iPhone vibrating and not making an audible sound. When LED flash for alerts is enabled, your iPhone’s flashlight will flash when you receive a new notification. This is great if you’re on the other side of the room or your iPhone is on the table, and you don’t feel the vibrations from your iPhone.
To enable LED Flash for Alerts:
1. Launch the Settings app on your iPhone
2. Scroll down and tap on Accessibility
3. Scroll down and tap Audio/Visual
4. Toggle LED Flash for Alerts on
Type to Siri
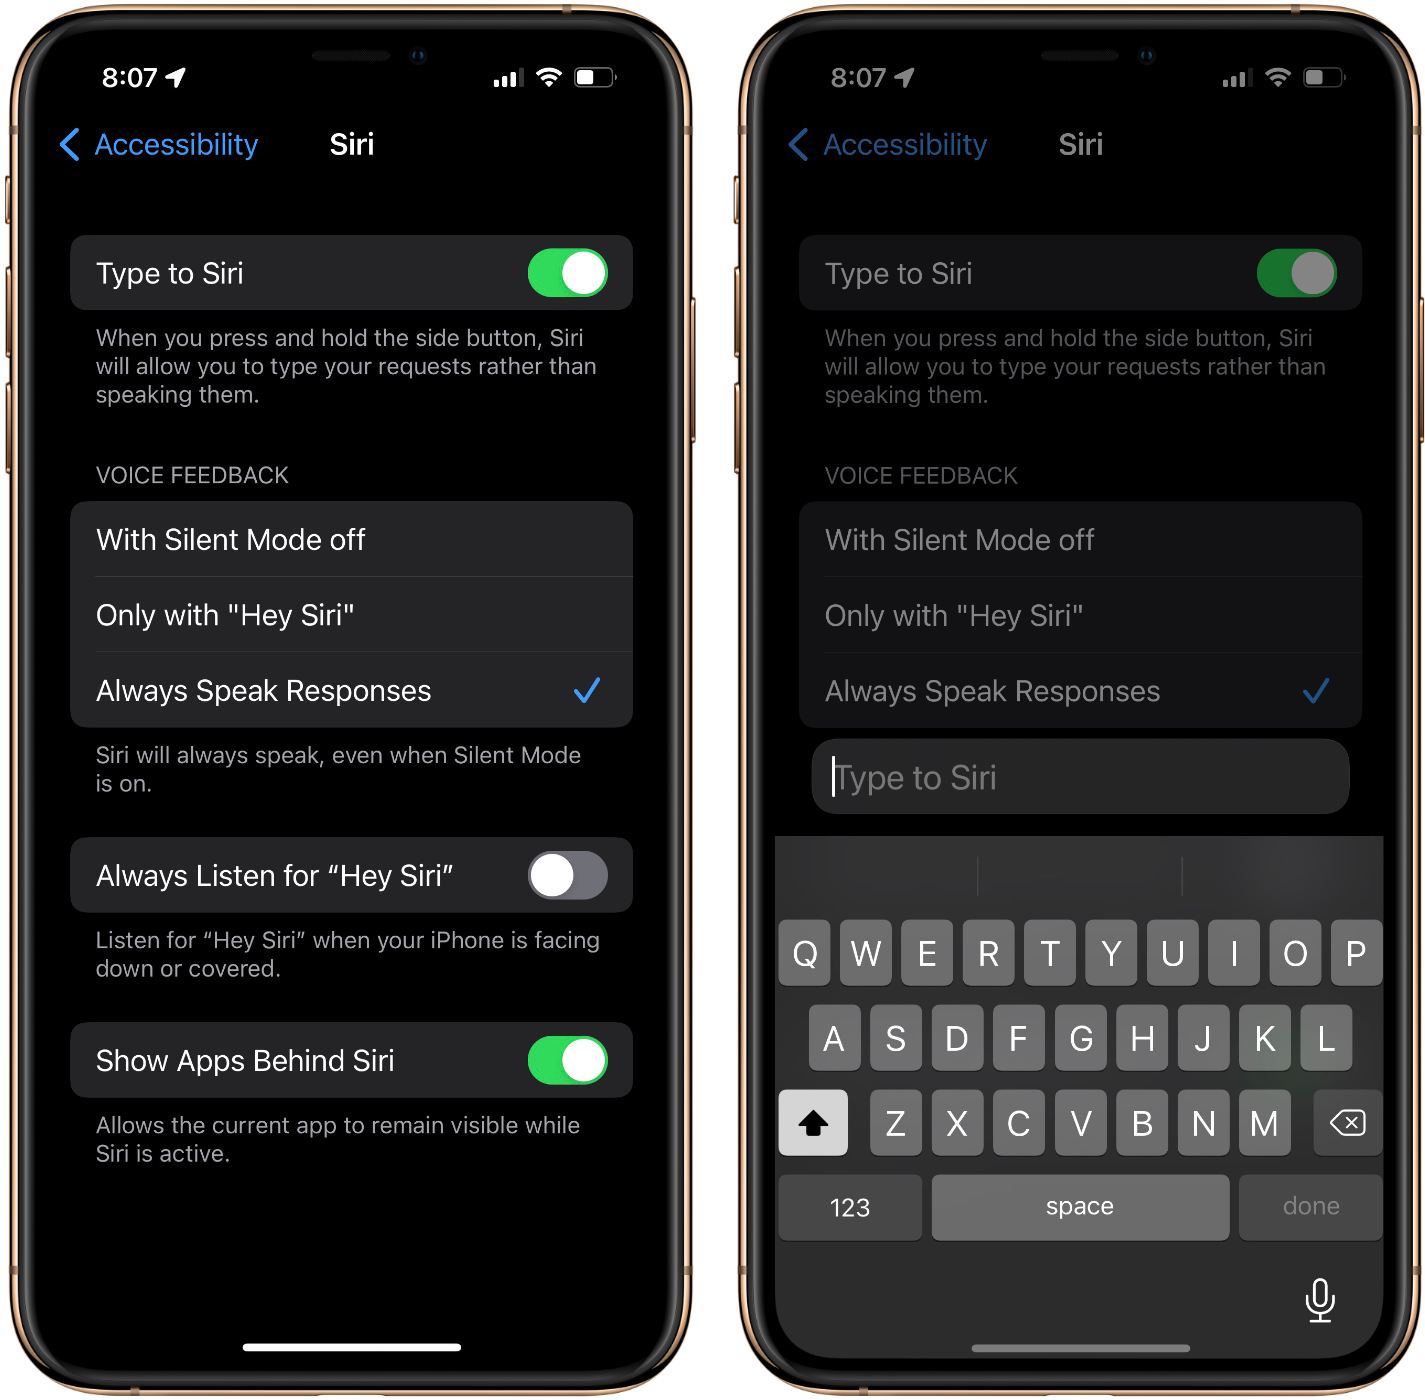
Everyone seems to have pretty strong opinions on Siri. I, for one, really like Siri, and I use it every day for timers, messages, HomeKit, and weather requests. Siri isn’t just a voice assistant, though. Siri is your Apple device assistant. You can use Type to Siri for those inaudible or who don’t want to make a voice request. As the name implies, you can type your Siri request instead of making a vocal command. You still hold down the home or side button depending on your iPhone model to activate Siri. Once activated, simply type your command, and Siri will execute that request.
To enable Type to Siri:
1. Launch the Settings app on your iPhone
2. Scroll down and tap on Accessibility
3. Scroll down to the bottom of the Accessibility page
4. Tap Siri
5. Toggle Type to Siri on
6. Hold down your home or side button to activate Siri
7. Type in your Siri request
Guided Access
Guided Access allows you to lock your iOS device into a single app mode. This is a fantastic tool for parents who don’t want their kids to leave a specific app like a game or video player. When Guided Access is enabled, you set a passcode to be used when you want to disable it. Once Guided Access is enabled by triple-clicking your iPhone’s home or side button, you can circle areas you’d like to disable from use.
To enable Guided Access:
1. Launch the Settings app on your iPhone
2. Scroll down and tap on Accessibility
3. Tap on Guided Access
4. Toggle Guided Access on
5. Triple-click your side or home button to enter Guided Access mode
6. Circle the areas you would like to display
7. Tap Start in the top right-hand corner
8. Triple-click your side or home button to exit Guided Access mode
Magnifier
When I was really young, my grandparents kept a magnifying glass in a tool drawer in the kitchen when they had difficulty viewing small-print. If you own an iPhone, you’re carrying a magnifying glass in your pocket. Magnifier is a feature on iOS that turns your camera into an advanced magnifying glass. Using Magnifier lets you use your iPhone’s digital zoom to enlarge small-print, adjust the display brightness, and freeze the image if you have shaky hands. Recently, Apple added the ability for Magnifier to alert you of people detected by your iPhone’s camera.
To enable Magnifier:
1. Launch the Settings app on your iPhone
2. Scroll down and tap on Accessibility
3. Scroll down to the bottom of the Accessibility page
4. Tap Accessibility Shortcut
5. Tap Magnifier
6. Triple-click your side button to launch Magnifier
While you’re on the Accessibly Shortcut page, you can tap on other accessibility actions you would like enabled when you tripe-press your iPhone’s side button. Suppose you have more than one command selected. In that case, you will be prompted to choose the accessibility action from a quick action pop-up menu. There is so much to accessibility on iOS that this article only scratches the surface. If you want to learn more about Apple’s accessibility efforts, you can visit their website to learn more!
MobileSyrup may earn a commission from purchases made via our links, which helps fund the journalism we provide free on our website. These links do not influence our editorial content. Support us here.
